 Save
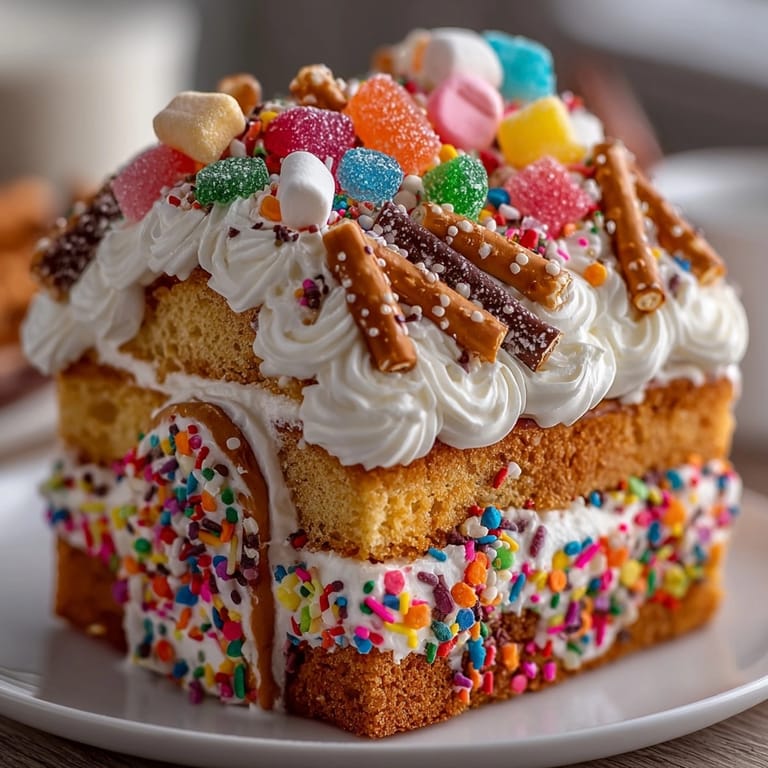
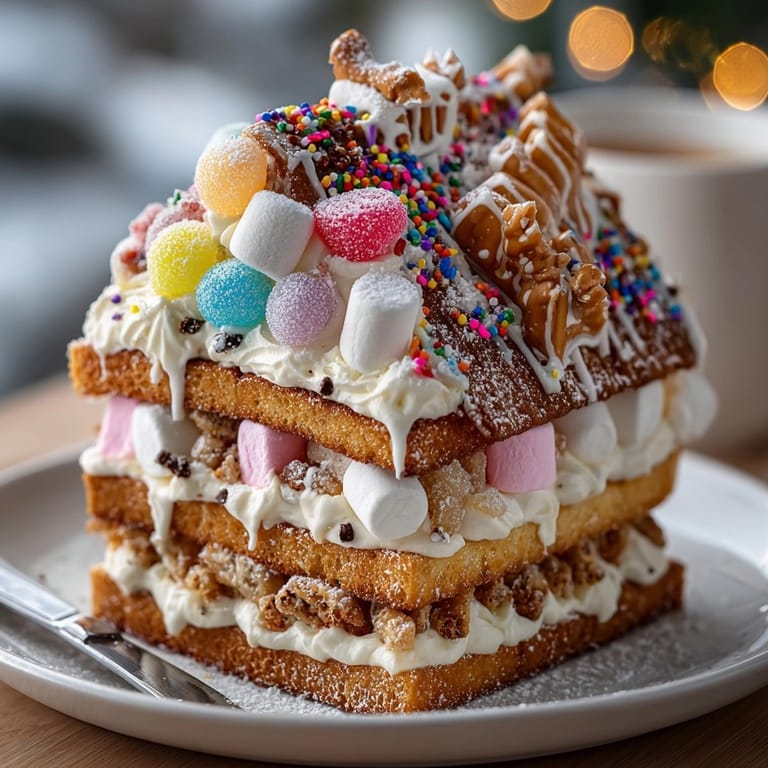
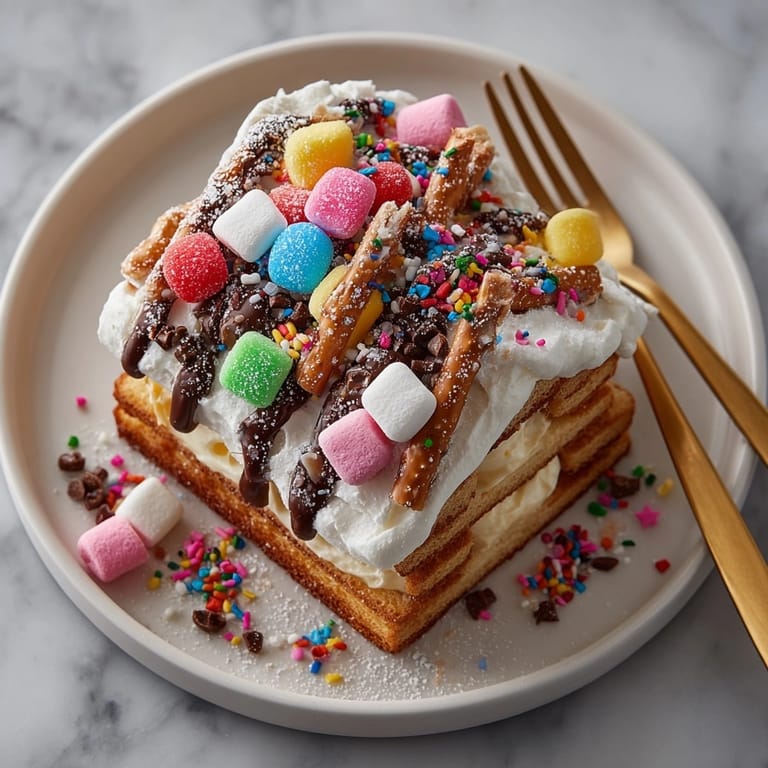
Save Whimsical messy and fun this silly cake gingerbread house is all about laughter in the kitchen and memories made with sticky fingers Born from my family's love for tradition with a twist it turns the classic gingerbread house into a cake creation—perfect for holidays or any afternoon when you want creativity to shine Get ready for an edible project where uneven walls and candy chaos are encouraged
The first time I made this we ended up with a wildly leaning house and gummy bears parachuting off the roof Now every year our gingerbread disaster cake is the centerpiece and the biggest laugh of the holiday spread
Ingredients
- All-purpose flour: gives the cake stability for cutting and stacking look for a fine unbleached variety
- Granulated sugar: brings classic sweetness
- Unsalted butter: ensures a rich taste and creamy texture always start with room temperature butter for easier mixing
- Whole milk: lends moisture for a tender crumb whole milk works best for flavor but any full-fat variation is a good swap
- Large eggs: bind everything together and help the cake rise pick fresh bright-yolk eggs
- Baking powder: is the leavening for a light airy cake
- Salt: balances sweetness look for fine sea salt for even integration
- Ground ginger plus cinnamon and nutmeg: infuses the cake with warm holiday flavor use fresh spices for a more pronounced scent
- Vanilla extract: rounds out the spice blend pure extract gives the best results
- Powdered sugar: forms the sweet base of your frosting sift for smoothness
- Assorted candies: like gumdrops candy canes and jelly beans deliver that playful look choose a mix of chewy crunchy and chocolate for texture and color
- Mini marshmallows: bring snow-like fluff
- Pretzel sticks: add structure or silly log cabin accents
- Chocolate chips: act as pebbles or chimney details use high-quality for richer chocolate notes
- Sprinkles and colored sugar: complete the festive bling
Tired of Takeout? 🥡
Get 10 meals you can make faster than delivery arrives. Seriously.
One email. No spam. Unsubscribe anytime.
Instructions
- Prep Your Pans:
- Grease and line two eight-inch square cake pans with baking paper to keep your cakes from sticking and make unmolding easy
- Make the Cake Batter:
- Cream the butter and sugar in a large bowl for about three minutes until light and fluffy then add eggs one at a time beating well and mixing in vanilla until smooth
- Mix Dry Ingredients:
- In a separate bowl whisk together flour baking powder salt ginger cinnamon and nutmeg making sure there are no lumps as this evenly disperses the spices
- Combine Wet and Dry Ingredients:
- Add dry ingredients to the butter mixture in three batches alternating with milk begin and end with flour stir until just combined to keep the cake tender and avoid overmixing
- Bake the Cakes:
- Pour batter evenly into prepared pans then bake at three hundred fifty degrees Fahrenheit for thirty to thirty five minutes test with a toothpick in the center for doneness
- Cool the Cakes:
- Let cakes cool in their pans for ten minutes then transfer to a wire rack and cool completely before attempting to cut
- Make the Frosting:
- In a separate bowl beat the softened butter until creamy then gradually add powdered sugar followed by vanilla and milk keep mixing until you have a smooth spreadable frosting
- Shape the House Pieces:
- Trust your creativity more than precision use a serrated knife to cut one cake into a base and roof pieces the other for walls and any extra features do not stress over wonky shapes imperfections add to the fun
- Assemble the House:
- Use frosting like glue to secure the pieces on a cake board or large plate let it lean collapse or wobble on purpose the messier the better
- Decorate with Joy:
- Pile on candies marshmallows pretzel sticks and chocolate chips get playful with snow icicles or patched up disasters using extra frosting
- Sprinkle the Magic:
- Finish with a cascade of colored sugars and sprinkles then let the house set for at least thirty minutes before moving or slicing
 Save
Save Our favorite part is always choosing the silliest candy combinations especially after cousin Max declared candy canes should be the house’s repair beams We once built a cake house so wild the roof caved in and everyone cheered it on more than any perfectly built model
Storage Tips
Keep your decorated house covered at room temperature for up to two days If you want to store it longer wrap leftover cake slices well and they will stay tasty in the fridge for up to four days The candies get chewier over time adding more texture with each bite
Ingredient Substitutions
Swap in a boxed yellow or spice cake mix if you’re short on time or baking supplies Use dairy-free butter and plant milk for an allergy-friendly version If you don’t have fresh ginger just use a little extra ground ginger or a pinch of allspice for new depth
Serving Suggestions
Slice thick wedges and serve alongside mugs of hot cocoa or spiced cider For birthday fun add small figurines for a cake-village scene Scatter extra marshmallows and candies on the plate like a sugary snowbank
Cultural Context
The original gingerbread house tradition dates back to nineteenth-century Germany but turning it into a cake is a joyful American twist in our family Mixing holiday baking with wild creativity brings everyone together for both play and a sweet treat
Seasonal Adaptations
Springtime house Add pastel candies and bunny gummies Summer party Use bright fruity candies with coconut flakes on the roof Halloween twist Build a spooky haunted house with licorice bats and candy corn fences
 Save
Save This cake is all about leaving perfection aside and making sweet messy memories together—no two houses are ever the same and that's exactly the magic
Recipe Questions
- → How do I shape the cake into a house?
Once cooled, cut the cakes into rectangles and triangles to form walls and roof pieces. Assemble on a board, letting the sides lean for a silly touch.
- → What candies work best for decorating?
Use gumdrops, candy canes, jelly beans, mini marshmallows, chocolate chips, and sprinkles. Mix and match for playful color and texture.
- → Can I make the cake ahead of time?
Yes, bake the cake layers a day in advance. Store airtight and assemble with frosting and candies when ready to build and decorate.
- → How can kids join in the process?
Encourage children to design their own “disaster” houses by arranging pieces and piling on sweets. Let creativity and messiness rule!
- → Is there a way to boost ginger flavor?
Add freshly grated ginger to the batter, or sprinkle ginger candies on top for extra zing in each bite.