 Save
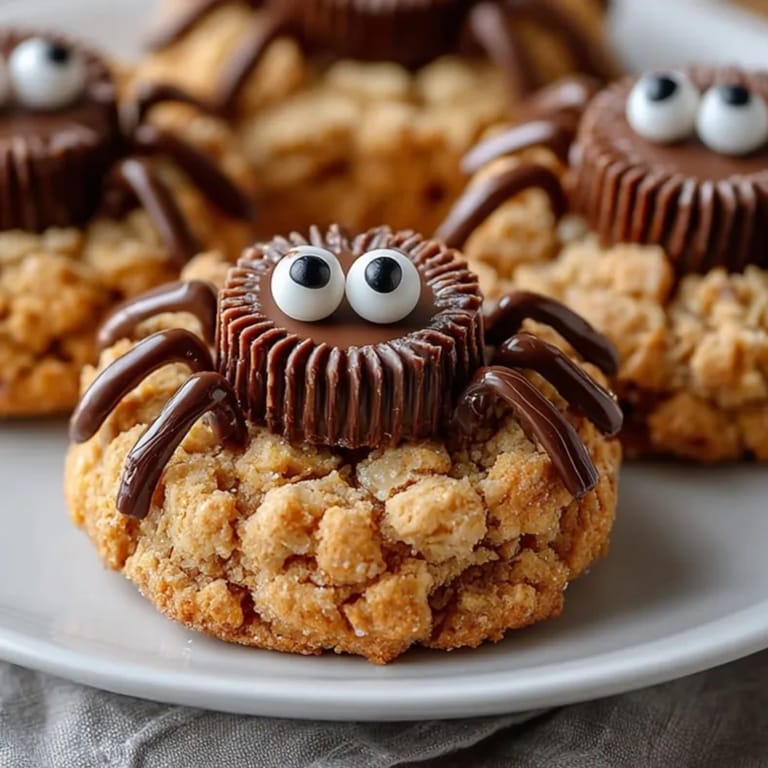
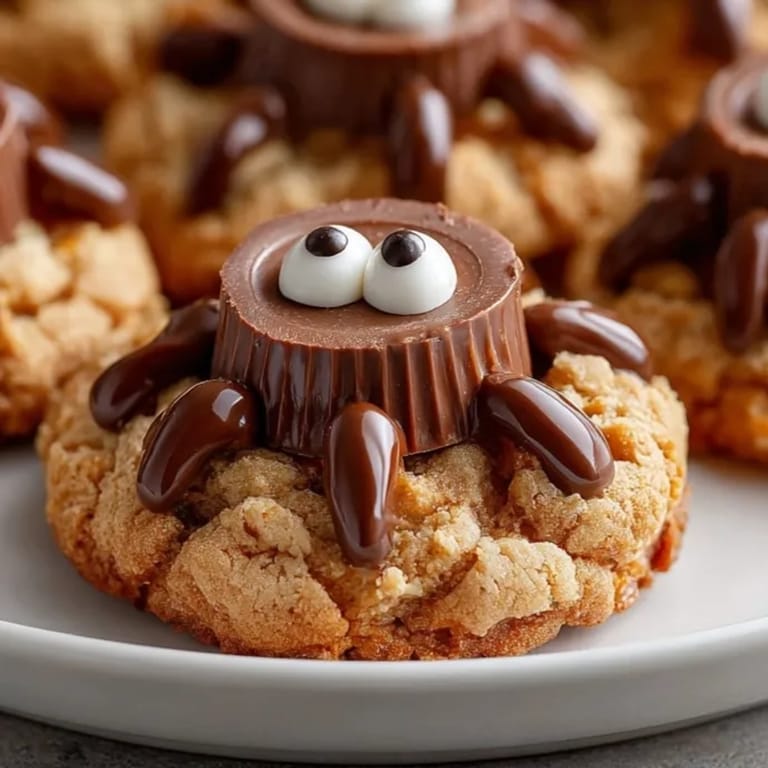
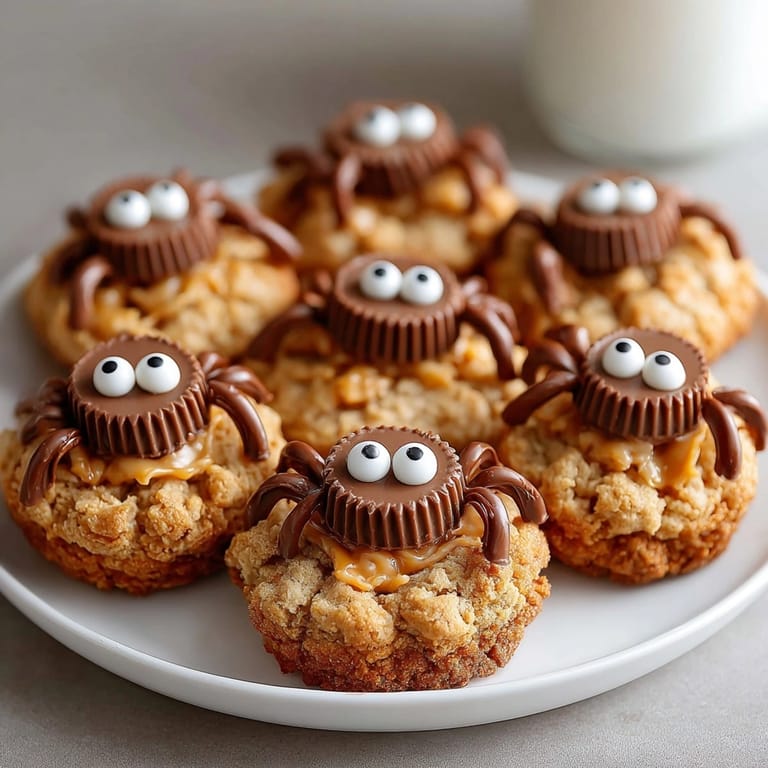
Save These whimsical peanut butter spider cookies bring together melt-in-your-mouth cookies and playful chocolate decorations to delight kids and grown-ups alike. I reach for this recipe every October—it is a crowd favorite at Halloween parties and always gets a giggle when I show up with a plate at a school event.
The first time I baked these for my nephew's school party, I worried they might look more spooky than cute. But the kids loved assembling the spiders and eating them just as much as helping decorate.
Ingredients
- Unsalted butter: gives each cookie a tender crumb and rich flavor look for high-quality butter that is a pale yellow and smells fresh
- Creamy peanut butter: creates a smooth chewy base check for minimal added sugar to highlight the peanut taste
- Granulated sugar: provides sweetness and contributes to the cookie's crisp edges
- Light brown sugar, packed: adds moisture and a subtle caramel flavor select soft brown sugar without hard clumps
- Large egg: binds the dough and delivers structure use room temperature for smooth blending
- Vanilla extract: brings roundness and warmth opt for pure extract if possible
- All-purpose flour: gives cookies body and helps them rise make sure it is fresh for best results
- Baking soda: ensures each cookie puffs and browns as it bakes test freshness by adding a pinch to vinegar for fizz
- Salt: sharpens the flavors in each bite fine sea salt works well
- Mini chocolate peanut butter cups or chocolate truffles: are the spider bodies choose ones with a glossy finish
- Semisweet chocolate chips, melted: form the delicate legs the higher the cocoa content the glossier the finish
- Candy eyes: add cheerfulness pick ones that are vividly colored and intact for a lively look
Tired of Takeout? 🥡
Get 10 meals you can make faster than delivery arrives. Seriously.
One email. No spam. Unsubscribe anytime.
Instructions
- Prepare the Oven and Pans:
- Set your oven to 350 degrees Fahrenheit or 175 degrees Celsius and line two baking sheets with parchment paper to prevent sticking and achieve evenly baked bottoms
- Cream Butter and Sugars:
- Combine the softened butter peanut butter granulated sugar and brown sugar in a large bowl then cream together until the mixture is light and fluffy this step traps air and ensures tender cookies
- Add Wet Ingredients:
- Beat in the large egg and the vanilla extract blending until the mixture is fully combined scrape down the sides to ensure no streaks remain
- Combine Dry Ingredients:
- In a separate bowl whisk together flour baking soda and salt to evenly distribute the leavening and seasoning
- Mix Dough:
- Gradually add the dry ingredients into the wet mixture stir just until you no longer see streaks of flour overmixing will create tough cookies
- Shape Scoops:
- Scoop out tablespoon sized balls of dough and place them on your lined baking sheets at least two inches apart to allow room for spreading
- Bake the Cookies:
- Pop the sheets in the oven and bake for eight to ten minutes until you see the cookie edges set slightly golden and tops look just set
- Add Spider Bodies:
- Immediately press one mini peanut butter cup into the center of each hot cookie the heat will soften the chocolate just enough for it to adhere
- Cool and Transfer:
- Let cookies cool on the tray for five minutes to finish setting then gently move them to a wire rack to cool completely
- Create Spider Legs:
- Once cool transfer melted chocolate to a piping or zip-top bag with a small tip then pipe three or four legs on each side of the peanut butter cup keeping steady hands for fine lines
- Attach the Eyes:
- Dab a bit of melted chocolate onto the back of each candy eye stick two eyes to the top of each peanut butter cup gently press to adhere then let sit until the chocolate sets
 Save
Save I love decorating these cookies with my little cousins. Lining up the mini peanut butter cups and piping silly spider legs brings out their creativity every year. Watching them carefully press on candy eyes always makes for the best family photos.
Storage Tips
Keep your cookies in a tightly sealed container at room temperature for up to four days for softest results. If stacking the cookies separate layers with a sheet of parchment so decorations stay intact. You can also freeze the undecorated cookies and add chocolate and candy eyes after thawing.
Ingredient Substitutions
Sunflower seed butter gives a nut free option which tastes just as rich as peanut butter. Try chocolate truffles or chocolate kisses in place of peanut butter cups. If no candy eyes are available white chocolate chips and edible marker can be used instead.
Serving Suggestions
Serve the cookies as a centerpiece at Halloween parties or wrap them in clear bags as festive favors. They pair well with a mug of warm cider or a glass of cold milk. I sometimes place extra melted chocolate in a bowl for kids to drizzle their own creative webs or faces.
Cultural and Historical Context
Peanut butter cookies have been a beloved American classic since the early 1900s when peanut butter gained popularity. The playful spider decoration is a modern twist inspired by the trend for fun holiday treats that kids can help decorate. This recipe brings together nostalgia and whimsy perfect for today's family gatherings.
Seasonal Adaptations
Use dark chocolate and autumn themed candy eyes for a harvest look Swap out the spider decoration for snowmen or reindeer after Halloween Add colored sprinkles or edible glitter for extra holiday sparkle
Success Stories
After sharing these cookies at my child's classroom party one year even the teacher called for the recipe. My neighbor once brought hers to a bake sale and said they sold out faster than any other treat. Decorating them with a group of friends or family always turns into an afternoon of laughter.
Freezer Meal Conversion
Freeze undecorated cookies in airtight bags for up to two months. When ready to serve let them thaw at room temperature and decorate fresh with chocolate and candy eyes for best presentation. The baked and decorated cookies can also be frozen in a single layer in sturdy containers but take care not to stack to preserve the delicate legs.
 Save
Save Enjoy these peanut butter spider cookies at your next festive gathering—they'll bring playful smiles and delicious flavor to the celebration.
Recipe Questions
- → Can I use crunchy peanut butter instead of creamy?
Yes, crunchy peanut butter adds texture, but creamy works best for smooth cookies and easy decoration.
- → How do I make these nut-free?
Replace peanut butter with sunflower seed butter and use chocolate candies instead of peanut butter cups.
- → How should I store these cookies?
Keep cookies in an airtight container at room temperature for up to four days to maintain freshness.
- → Can I use other kinds of chocolate for decoration?
Dark or milk chocolate chips both work well for piping spider legs and enhance flavor variety.
- → What’s the best way to stick candy eyes?
A dot of melted chocolate on the back of each candy eye helps them adhere securely to the peanut butter cups.
- → Are these suitable for vegetarians?
Yes, they are vegetarian, but check labels on candy eyes and chocolate for dietary restrictions.