Save
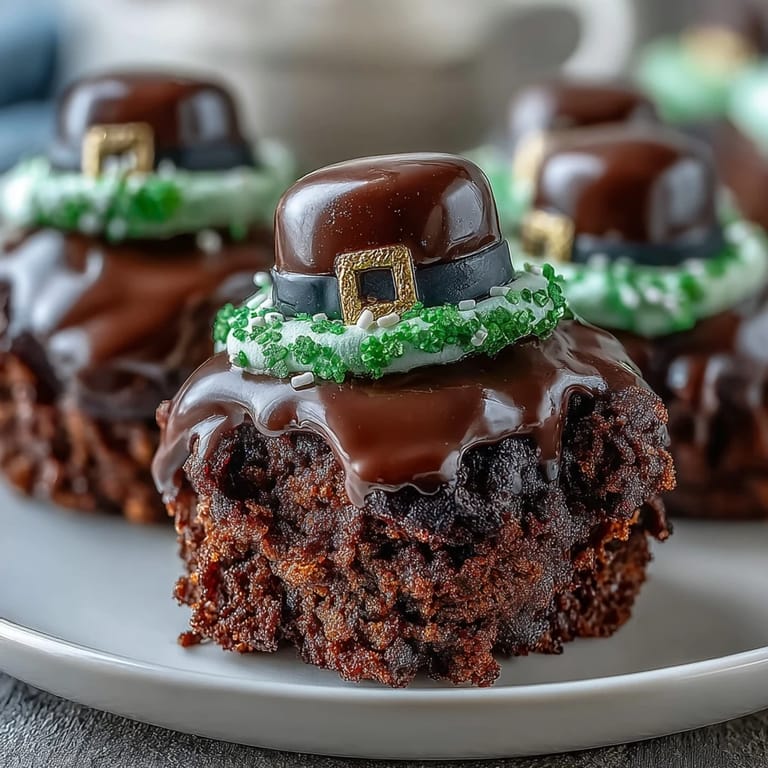
Save My sister texted me a photo of leprechaun hats from a bakery downtown, and I remember thinking, why buy those when I could make something better? Two hours later, my kitchen smelled like chocolate and marshmallow, and I had these tiny, ridiculous little brownie bites stacked with candy hats sitting on the counter. They looked like something from a fairy tale, but tasted like actual dessert. That's when I knew this recipe had to happen.
I brought these to a St. Patrick's Day potluck last year, and someone genuinely asked if I'd ordered them from a professional bakery. The marshmallow hats kept sliding off because the chocolate hadn't set quite right, which should have been embarrassing, but instead everyone thought it was charming. We all ended up eating them with our hands anyway, laughing at the green icing smudging our fingers.
Ingredients
- Unsalted butter, melted (1/2 cup): Melted butter creates that tender crumb; cold butter won't blend smoothly into the sugar.
- Granulated sugar (1 cup): This is what gives the brownie its fudgy density, so don't be tempted to reduce it.
- Large eggs (2): Room temperature eggs incorporate better and make the batter silkier.
- Vanilla extract (1 tsp): A small amount deepens the chocolate flavor without making it taste vanilla-forward.
- Unsweetened cocoa powder (1/3 cup): The real chocolate backbone here; don't use sweetened cocoa or the brownie becomes cloying.
- All-purpose flour (1/2 cup): Measured by weight if possible, since packing flour changes everything about texture.
- Salt (1/4 tsp): Brings out the chocolate and balances sweetness, even though you won't taste it directly.
- Baking powder (1/4 tsp): Just enough to give the brownie a slight lift without making it cakey.
- Large marshmallows (24): The bigger ones work better for dipping and sitting on top without toppling.
- Dark or semisweet chocolate chips (1 cup): I prefer dark chocolate because it contrasts beautifully with the sweet marshmallow, but either works.
- Unsalted butter for melting (2 tbsp): Thinning the chocolate makes it drape over the marshmallow like a proper hat.
- Thin round chocolate wafer cookies (24): These act as the brim and keep the hat from sliding down.
- Green icing: Store-bought saves time, but homemade buttercream tinted green tastes better and feels more personal.
- Gold sprinkles or edible glitter (optional): The buckle detail that makes it unmistakably a leprechaun hat.
Tired of Takeout? 🥡
Get 10 meals you can make faster than delivery arrives. Seriously.
One email. No spam. Unsubscribe anytime.
Instructions
- Preheat and prepare:
- Set your oven to 350°F and get your mini muffin pan ready with liners or a light greasing. Cold pans can make brownie edges bake faster than centers, so this step matters more than it sounds.
- Combine wet ingredients:
- Whisk the melted butter and sugar together until they look almost pale, then add eggs and vanilla. This mixture should feel silky when you lift the whisk; if it looks separated, you're good anyway.
- Fold in dry ingredients:
- Sift the cocoa, flour, salt, and baking powder right over your wet mixture, then stir gently until just combined. Stop the moment you don't see dry streaks anymore; overmixing brownie batter is how you end up with cakey results.
- Fill the pan:
- Spoon batter into each mini cup until about two-thirds full, leaving a little room for the brownie to rise slightly. The batter is thick, so it won't spread much anyway.
- Bake the brownie bites:
- Bake for 12 to 15 minutes; the exact time depends on your oven's mood. A toothpick should come out mostly clean with just a few moist crumbs clinging to it.
- Cool completely:
- Leave the brownies in the pan while they cool fully before removing them. Trying to pop them out while warm is how you end up with broken brownie bites and regret.
- Melt the chocolate:
- In a microwave-safe bowl, melt chocolate chips and butter in 30-second bursts, stirring between each one to prevent scorching. The mixture should be smooth and glossy, not grainy or broken-looking.
- Dip the marshmallows:
- Insert a toothpick into each marshmallow and dip it into the melted chocolate, rotating gently to coat completely. Let excess chocolate drip off for a moment before setting each one on a chocolate wafer cookie.
- Set the hat brim:
- Letting the chocolate firm up while the marshmallow sits on the cookie is crucial; it's what holds the whole hat structure together. Patience here saves you from hats falling off later.
- Add the band and buckle:
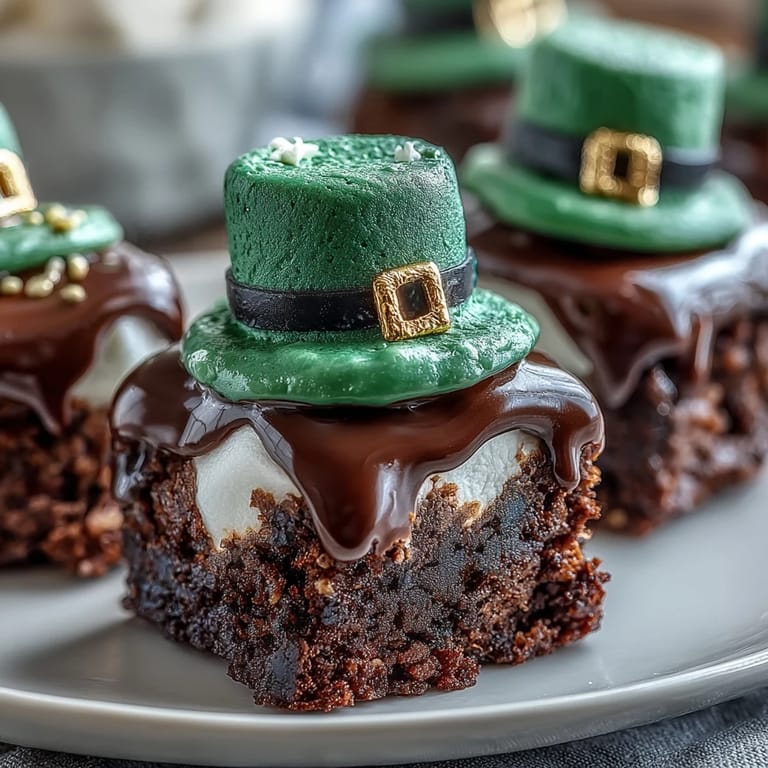
- Once chocolate is firm, pipe or spread a band of green icing around the base of the marshmallow, then top with gold sprinkles for the buckle detail. This is where it transforms from marshmallow into actual leprechaun attire.
- Assemble the bite:
- Gently press each completed hat onto a brownie bite, letting the icing help it adhere. Remove the toothpick carefully, and you're done.
 Save
Save I made these for my niece's school bake sale, and she wore a little leprechaun outfit to help sell them. Watching her face light up when kids started grabbing them—like she'd personally invented tiny chocolate architecture—reminded me why fussy desserts are worth the time. Food that makes people smile like that is never just dessert.
The Brownie Part Matters
The brownies themselves are intentionally dense and fudgy, not fluffy or cakey, because they're meant to be a base that holds the weight of the chocolate-dipped marshmallow without crumbling. If your brownie bites feel too dry when you remove them from the pan, they either baked a minute or two too long, or your flour was packed too tightly. Sifting the dry ingredients really does make a difference in texture, even if it feels old-fashioned.
Melting Chocolate Like You Mean It
The trick to silky, dippable chocolate is not letting it get too hot, and adding butter helps thin it without adding water, which would seize the chocolate into a grainy mess. If you're worried about burning it in the microwave, you can use a double boiler instead, though honestly, 30-second intervals work perfectly fine for most home kitchens. Stir between each burst, and stop melting the moment you see soft, glossy chocolate.
Making These Your Own
The green icing and gold sprinkles are traditional for St. Patrick's Day, but these leprechaun hats could show up for Christmas with red icing and silver, or as garden gnomes with flesh-toned icing and little hats. The structure works for any holiday or season, so think of this recipe as a formula you can adapt year-round.
- A gluten-free version works perfectly if you swap the flour and cookies for gluten-free versions, keeping everything else the same.
- If piping feels fussy, you can spread green icing with a small knife instead and still get the leprechaun hat effect.
- These store in an airtight container for three days, though they're best eaten within the first day while the chocolate is still snappy.
 Save
Save These little brownie bites prove that festive food doesn't have to be complicated, just playful. Make them, watch people's faces when they see what's on top, and remember that sometimes the best recipes are the ones that make someone laugh and reach for seconds.
Recipe Questions
- → What type of chocolate works best for dipping the marshmallows?
Using semisweet or dark chocolate chips provides a nice balance of sweetness and richness that complements the brownie base.
- → Can I make these brownie bites gluten-free?
Yes, substituting gluten-free flour and using gluten-free wafer cookies will make these treats gluten-free.
- → How can I ensure the marshmallow hats stay securely on the brownie bites?
Allow the dipped marshmallows to set fully on the wafer cookies before placing them on the brownies, and use green icing to adhere them firmly.
- → What is the best way to melt chocolate to avoid burning?
Melt chocolate in 30-second intervals in the microwave, stirring between each to ensure smoothness and prevent burning.
- → Are there alternatives to green icing for decorating the hats?
Colored fondant can be used instead of icing for a firmer, customizable band around the marshmallow hats.